> ## Documentation Index
> Fetch the complete documentation index at: https://docs.dakora.io/llms.txt
> Use this file to discover all available pages before exploring further.
# Templates
> Create, manage, and version reusable prompt templates with typed inputs and composable parts
Stop copy-pasting prompts across your codebase. **Templates** let you define a prompt once, use it everywhere, and track every change automatically.
 **Why templates?**
* Write dynamic prompts with variables, loops, and conditionals
* Catch errors early with typed, validated inputs
* Roll back to any previous version instantly
* Share common snippets across templates with **parts**
***
## Built-in Templates
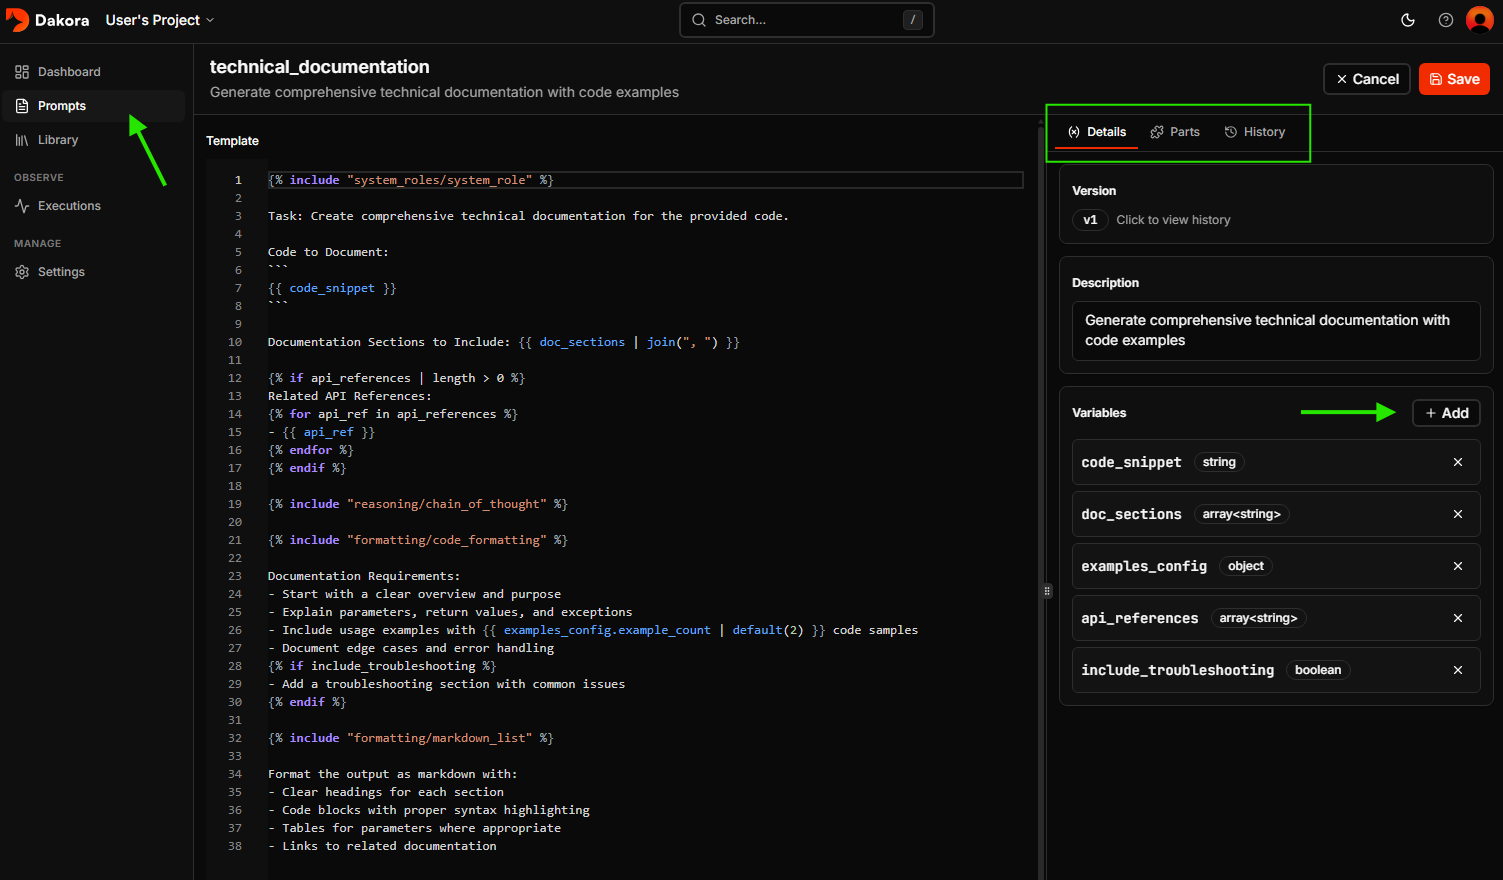
Every new project includes ready-to-use templates:
| Template | Description |
| ------------------------- | ----------------------------------------------------------------- |
| `faq_responder` | Answer FAQ questions using a knowledge base with source citations |
| `research_synthesizer` | Synthesize multiple sources into a cohesive summary |
| `technical_documentation` | Generate comprehensive docs with code examples |
| `social_media_campaign` | Create multi-platform social media posts from a brief |
Open any built-in template in the Studio to see how it uses parts, loops, and typed inputs. Then duplicate and customize it for your use case.
***
## Creating Templates
Go to **Library** → **Prompts** in the sidebar and click **New Prompt**.
Write your prompt using `{{ variable }}` placeholders for dynamic content.
```jinja theme={null}
Answer the following question using the provided knowledge base.
Question: {{ question }}
Knowledge Base: {{ knowledge_base }}
Tone: {{ tone }}
```
In the Variables panel, add each variable with its type and default value.
Use the built-in playground to test with sample inputs before saving.
Click **Save** to make the template available via SDK.
```python theme={null}
import asyncio
from dakora import Dakora
async def main():
client = Dakora()
await client.prompts.create(
prompt_id="email_composer",
template="""Write a {{ email_type }} email.
Context: {{ context }}
{% if bullet_points %}
Key points to include:
{% for point in bullet_points %}
- {{ point }}
{% endfor %}
{% endif %}
Tone: {{ tone }}
Max length: {{ max_words }} words""",
description="Compose professional emails with customizable tone",
inputs={
"email_type": {"type": "string", "required": True},
"context": {"type": "string", "required": True},
"bullet_points": {"type": "array", "default": []},
"tone": {"type": "string", "default": "professional"},
"max_words": {"type": "number", "default": 200},
},
)
asyncio.run(main())
```
***
## Inputs
Inputs are typed variables that make your templates dynamic. Define them when creating a template:
```python theme={null}
inputs={
"question": {"type": "string", "required": True},
"sources": {"type": "array", "required": True},
"max_sources": {"type": "number", "default": 5},
"include_citations": {"type": "boolean", "default": True},
}
```
Supported types: `string`, `number`, `boolean`, `array`, and `object`.
Dakora validates inputs at render time. Missing required inputs or type mismatches fail fast with clear error messages.
***
## Jinja2 Syntax
Dakora uses [Jinja2](https://jinja.palletsprojects.com/), a popular Python templating engine, to make your prompts dynamic. Use `{{ variable }}` for inserting values, `{% if %}` for conditionals, and `{% for %}` for loops.
```jinja theme={null}
Question: {{ question }}
Knowledge Base: {{ knowledge_base }}
```
```jinja theme={null}
{% if include_sources %}
Requirements:
- Cite specific information from the knowledge base
- Include source references where applicable
{% endif %}
```
Iterate over arrays like sources or platforms:
```jinja theme={null}
Sources:
{% for source in sources %}
Source {{ loop.index }}:
{{ source }}
{% endfor %}
```
```jinja theme={null}
{{ platforms | join(", ") }} {# Twitter, LinkedIn, Instagram #}
{{ tone | default("helpful") }} {# Fallback if empty #}
```
***
## Parts (Reusable Snippets)
**Parts** are reusable prompt snippets that can be included in any template. Every project comes with built-in parts you can use immediately.
### Built-in Parts
| Part | Category | What it does |
| ------------------ | -------------- | ------------------------------------------------------ |
| `system_role` | `system_roles` | Sets the AI persona: "You are a helpful AI assistant." |
| `json_output` | `formatting` | Instructs JSON-formatted responses |
| `markdown_list` | `formatting` | Formats output as markdown lists |
| `chain_of_thought` | `reasoning` | Enables step-by-step reasoning |
| `citation_format` | `guidelines` | Standardizes citation formatting |
### Including Parts
Use Jinja2's `{% include %}` directive with the path `category/part_id`:
```jinja theme={null}
{% include "system_roles/system_role" %}
Task: Answer the following FAQ question.
Question: {{ question }}
{% include "formatting/json_output" %}
```
### Creating Your Own Parts
In the Studio, go to **Library** → **Parts**:
1. Click **New Part**
2. Set a **Part ID** (e.g., `company_context`)
3. Choose a **Category** (e.g., `context`)
4. Write the reusable prompt content
5. Save and use with `{% include "context/company_context" %}`
***
## Versioning
Every save creates a new version automatically. Templates start at version 1, and each save increments the number. Content hashing prevents duplicate versions.
### Pinning Versions
By default, `render()` uses the latest version. In production, pin to a tested version:
```python Latest (default) theme={null}
result = await client.prompts.render(
"faq_responder",
{"question": "How do I upgrade?", "knowledge_base": "..."},
)
```
```python Pinned to v3 theme={null}
result = await client.prompts.render(
"faq_responder",
{"question": "How do I upgrade?", "knowledge_base": "..."},
version="3",
)
```
### Rolling Back
In the Studio, open any template → click **History** → select a version → **Restore**.
Rolling back creates a new version with the old content, preserving the audit trail.
***
## Rendering Templates
**Rendering** takes a template and fills in its variables with your inputs, resolves any included parts, and returns a complete prompt string ready to send to any LLM.
In the Studio, you can test rendering in two ways:
1. **Preview Panel**: Shows your template with parts resolved, but variables remain as `{{ placeholders }}` so you can see the structure.
2. **Test Panel**: Fill in input values, select an LLM model, and run the template end-to-end. This renders the template AND sends it to the LLM, showing you the actual response.
**Why templates?**
* Write dynamic prompts with variables, loops, and conditionals
* Catch errors early with typed, validated inputs
* Roll back to any previous version instantly
* Share common snippets across templates with **parts**
***
## Built-in Templates
Every new project includes ready-to-use templates:
| Template | Description |
| ------------------------- | ----------------------------------------------------------------- |
| `faq_responder` | Answer FAQ questions using a knowledge base with source citations |
| `research_synthesizer` | Synthesize multiple sources into a cohesive summary |
| `technical_documentation` | Generate comprehensive docs with code examples |
| `social_media_campaign` | Create multi-platform social media posts from a brief |
Open any built-in template in the Studio to see how it uses parts, loops, and typed inputs. Then duplicate and customize it for your use case.
***
## Creating Templates
Go to **Library** → **Prompts** in the sidebar and click **New Prompt**.
Write your prompt using `{{ variable }}` placeholders for dynamic content.
```jinja theme={null}
Answer the following question using the provided knowledge base.
Question: {{ question }}
Knowledge Base: {{ knowledge_base }}
Tone: {{ tone }}
```
In the Variables panel, add each variable with its type and default value.
Use the built-in playground to test with sample inputs before saving.
Click **Save** to make the template available via SDK.
```python theme={null}
import asyncio
from dakora import Dakora
async def main():
client = Dakora()
await client.prompts.create(
prompt_id="email_composer",
template="""Write a {{ email_type }} email.
Context: {{ context }}
{% if bullet_points %}
Key points to include:
{% for point in bullet_points %}
- {{ point }}
{% endfor %}
{% endif %}
Tone: {{ tone }}
Max length: {{ max_words }} words""",
description="Compose professional emails with customizable tone",
inputs={
"email_type": {"type": "string", "required": True},
"context": {"type": "string", "required": True},
"bullet_points": {"type": "array", "default": []},
"tone": {"type": "string", "default": "professional"},
"max_words": {"type": "number", "default": 200},
},
)
asyncio.run(main())
```
***
## Inputs
Inputs are typed variables that make your templates dynamic. Define them when creating a template:
```python theme={null}
inputs={
"question": {"type": "string", "required": True},
"sources": {"type": "array", "required": True},
"max_sources": {"type": "number", "default": 5},
"include_citations": {"type": "boolean", "default": True},
}
```
Supported types: `string`, `number`, `boolean`, `array`, and `object`.
Dakora validates inputs at render time. Missing required inputs or type mismatches fail fast with clear error messages.
***
## Jinja2 Syntax
Dakora uses [Jinja2](https://jinja.palletsprojects.com/), a popular Python templating engine, to make your prompts dynamic. Use `{{ variable }}` for inserting values, `{% if %}` for conditionals, and `{% for %}` for loops.
```jinja theme={null}
Question: {{ question }}
Knowledge Base: {{ knowledge_base }}
```
```jinja theme={null}
{% if include_sources %}
Requirements:
- Cite specific information from the knowledge base
- Include source references where applicable
{% endif %}
```
Iterate over arrays like sources or platforms:
```jinja theme={null}
Sources:
{% for source in sources %}
Source {{ loop.index }}:
{{ source }}
{% endfor %}
```
```jinja theme={null}
{{ platforms | join(", ") }} {# Twitter, LinkedIn, Instagram #}
{{ tone | default("helpful") }} {# Fallback if empty #}
```
***
## Parts (Reusable Snippets)
**Parts** are reusable prompt snippets that can be included in any template. Every project comes with built-in parts you can use immediately.
### Built-in Parts
| Part | Category | What it does |
| ------------------ | -------------- | ------------------------------------------------------ |
| `system_role` | `system_roles` | Sets the AI persona: "You are a helpful AI assistant." |
| `json_output` | `formatting` | Instructs JSON-formatted responses |
| `markdown_list` | `formatting` | Formats output as markdown lists |
| `chain_of_thought` | `reasoning` | Enables step-by-step reasoning |
| `citation_format` | `guidelines` | Standardizes citation formatting |
### Including Parts
Use Jinja2's `{% include %}` directive with the path `category/part_id`:
```jinja theme={null}
{% include "system_roles/system_role" %}
Task: Answer the following FAQ question.
Question: {{ question }}
{% include "formatting/json_output" %}
```
### Creating Your Own Parts
In the Studio, go to **Library** → **Parts**:
1. Click **New Part**
2. Set a **Part ID** (e.g., `company_context`)
3. Choose a **Category** (e.g., `context`)
4. Write the reusable prompt content
5. Save and use with `{% include "context/company_context" %}`
***
## Versioning
Every save creates a new version automatically. Templates start at version 1, and each save increments the number. Content hashing prevents duplicate versions.
### Pinning Versions
By default, `render()` uses the latest version. In production, pin to a tested version:
```python Latest (default) theme={null}
result = await client.prompts.render(
"faq_responder",
{"question": "How do I upgrade?", "knowledge_base": "..."},
)
```
```python Pinned to v3 theme={null}
result = await client.prompts.render(
"faq_responder",
{"question": "How do I upgrade?", "knowledge_base": "..."},
version="3",
)
```
### Rolling Back
In the Studio, open any template → click **History** → select a version → **Restore**.
Rolling back creates a new version with the old content, preserving the audit trail.
***
## Rendering Templates
**Rendering** takes a template and fills in its variables with your inputs, resolves any included parts, and returns a complete prompt string ready to send to any LLM.
In the Studio, you can test rendering in two ways:
1. **Preview Panel**: Shows your template with parts resolved, but variables remain as `{{ placeholders }}` so you can see the structure.
2. **Test Panel**: Fill in input values, select an LLM model, and run the template end-to-end. This renders the template AND sends it to the LLM, showing you the actual response.
 ```python theme={null}
import asyncio
from dakora import Dakora
async def main():
client = Dakora()
result = await client.prompts.render(
"faq_responder",
{
"question": "How do I reset my password?",
"knowledge_base": "Users can reset passwords by clicking 'Forgot Password'...",
"tone": "friendly",
},
)
print(result.text)
# Output: The complete prompt with all variables filled in
asyncio.run(main())
```
```python theme={null}
result = await client.prompts.render(
"research_synthesizer",
inputs={
"research_question": "What are the benefits of remote work?",
"sources": ["Study A found...", "Report B shows..."],
},
version="3", # Pin to specific version
embed_metadata=False, # Disable tracking metadata
)
```
### RenderResult
| Field | Description |
| ---------------- | -------------------------------------- |
| `text` | The rendered prompt ready for your LLM |
| `prompt_id` | Template identifier |
| `version` | Semantic version used |
| `version_number` | Numeric version (1, 2, 3...) |
| `inputs` | The inputs that were provided |
By default, Dakora embeds tracking metadata: ``. This enables automatic linking of LLM executions back to templates. Disable with `embed_metadata=False`.
***
## Common Patterns
These patterns appear frequently in production templates:
Show or hide entire sections based on a flag:
```jinja theme={null}
{{ task_description }}
{% if include_examples %}
Examples:
{% for example in examples %}
- {{ example }}
{% endfor %}
{% endif %}
{% if strict_mode %}
Important: Follow the format exactly. Do not deviate.
{% endif %}
```
Build prompts from arrays of items:
```jinja theme={null}
Review the following documents and summarize key findings:
{% for doc in documents %}
## Document {{ loop.index }}: {{ doc.title }}
{{ doc.content }}
{% endfor %}
Provide a unified summary covering all {{ documents | length }} documents.
```
Handle optional inputs gracefully:
```jinja theme={null}
Role: {{ role | default("assistant") }}
Tone: {{ tone | default("professional") }}
Language: {{ language | default("English") }}
{% if constraints %}
Constraints: {{ constraints }}
{% else %}
No specific constraints. Use your best judgment.
{% endif %}
```
***
## Best Practices
Choose clear, descriptive template IDs:
* ✅ `faq_responder`, `research_synthesizer`, `social_media_campaign`
* ❌ `template1`, `v2_final_new`
If you're copying the same text across templates, extract it as a part:
```jinja theme={null}
{# Before: duplicated in every template #}
You are a helpful AI assistant.
{# After: use a part #}
{% include "system_roles/system_role" %}
```
Type definitions catch errors early:
```python theme={null}
inputs={
"question": {"type": "string", "required": True},
"sources": {"type": "array", "required": True},
"max_sources": {"type": "number", "default": 5},
}
```
```python theme={null}
result = await client.prompts.render(
"faq_responder",
inputs,
version="5", # Pin to tested version
)
```
Use the Playground to test templates before making them live.
***
## Reference
**Template Fields:**
| Field | Required | Description |
| ------------- | -------- | ----------------------------------------- |
| `id` | Yes | Unique identifier (e.g., `faq_responder`) |
| `template` | Yes | The prompt text with Jinja2 syntax |
| `description` | No | Human-readable description |
| `inputs` | No | Typed variable definitions with defaults |
| `version` | Auto | Semantic version string (e.g., `1.0.0`) |
| `metadata` | No | Custom metadata (tags, author, etc.) |
**Input Types:** `string`, `number`, `boolean`, `array`, `object`
***
## Next Steps
Now that you understand templates:
Test your templates with real inputs before deploying
Build your first template end-to-end
Monitor which templates are used and how they perform
Configure spending limits
```python theme={null}
import asyncio
from dakora import Dakora
async def main():
client = Dakora()
result = await client.prompts.render(
"faq_responder",
{
"question": "How do I reset my password?",
"knowledge_base": "Users can reset passwords by clicking 'Forgot Password'...",
"tone": "friendly",
},
)
print(result.text)
# Output: The complete prompt with all variables filled in
asyncio.run(main())
```
```python theme={null}
result = await client.prompts.render(
"research_synthesizer",
inputs={
"research_question": "What are the benefits of remote work?",
"sources": ["Study A found...", "Report B shows..."],
},
version="3", # Pin to specific version
embed_metadata=False, # Disable tracking metadata
)
```
### RenderResult
| Field | Description |
| ---------------- | -------------------------------------- |
| `text` | The rendered prompt ready for your LLM |
| `prompt_id` | Template identifier |
| `version` | Semantic version used |
| `version_number` | Numeric version (1, 2, 3...) |
| `inputs` | The inputs that were provided |
By default, Dakora embeds tracking metadata: ``. This enables automatic linking of LLM executions back to templates. Disable with `embed_metadata=False`.
***
## Common Patterns
These patterns appear frequently in production templates:
Show or hide entire sections based on a flag:
```jinja theme={null}
{{ task_description }}
{% if include_examples %}
Examples:
{% for example in examples %}
- {{ example }}
{% endfor %}
{% endif %}
{% if strict_mode %}
Important: Follow the format exactly. Do not deviate.
{% endif %}
```
Build prompts from arrays of items:
```jinja theme={null}
Review the following documents and summarize key findings:
{% for doc in documents %}
## Document {{ loop.index }}: {{ doc.title }}
{{ doc.content }}
{% endfor %}
Provide a unified summary covering all {{ documents | length }} documents.
```
Handle optional inputs gracefully:
```jinja theme={null}
Role: {{ role | default("assistant") }}
Tone: {{ tone | default("professional") }}
Language: {{ language | default("English") }}
{% if constraints %}
Constraints: {{ constraints }}
{% else %}
No specific constraints. Use your best judgment.
{% endif %}
```
***
## Best Practices
Choose clear, descriptive template IDs:
* ✅ `faq_responder`, `research_synthesizer`, `social_media_campaign`
* ❌ `template1`, `v2_final_new`
If you're copying the same text across templates, extract it as a part:
```jinja theme={null}
{# Before: duplicated in every template #}
You are a helpful AI assistant.
{# After: use a part #}
{% include "system_roles/system_role" %}
```
Type definitions catch errors early:
```python theme={null}
inputs={
"question": {"type": "string", "required": True},
"sources": {"type": "array", "required": True},
"max_sources": {"type": "number", "default": 5},
}
```
```python theme={null}
result = await client.prompts.render(
"faq_responder",
inputs,
version="5", # Pin to tested version
)
```
Use the Playground to test templates before making them live.
***
## Reference
**Template Fields:**
| Field | Required | Description |
| ------------- | -------- | ----------------------------------------- |
| `id` | Yes | Unique identifier (e.g., `faq_responder`) |
| `template` | Yes | The prompt text with Jinja2 syntax |
| `description` | No | Human-readable description |
| `inputs` | No | Typed variable definitions with defaults |
| `version` | Auto | Semantic version string (e.g., `1.0.0`) |
| `metadata` | No | Custom metadata (tags, author, etc.) |
**Input Types:** `string`, `number`, `boolean`, `array`, `object`
***
## Next Steps
Now that you understand templates:
Test your templates with real inputs before deploying
Build your first template end-to-end
Monitor which templates are used and how they perform
Configure spending limits