

- Write dynamic prompts with variables, loops, and conditionals
- Catch errors early with typed, validated inputs
- Roll back to any previous version instantly
- Share common snippets across templates with parts
Built-in Templates
Every new project includes ready-to-use templates:Creating Templates
- Studio
- SDK
1
Navigate to Library
Go to Library → Prompts in the sidebar and click New Prompt.
2
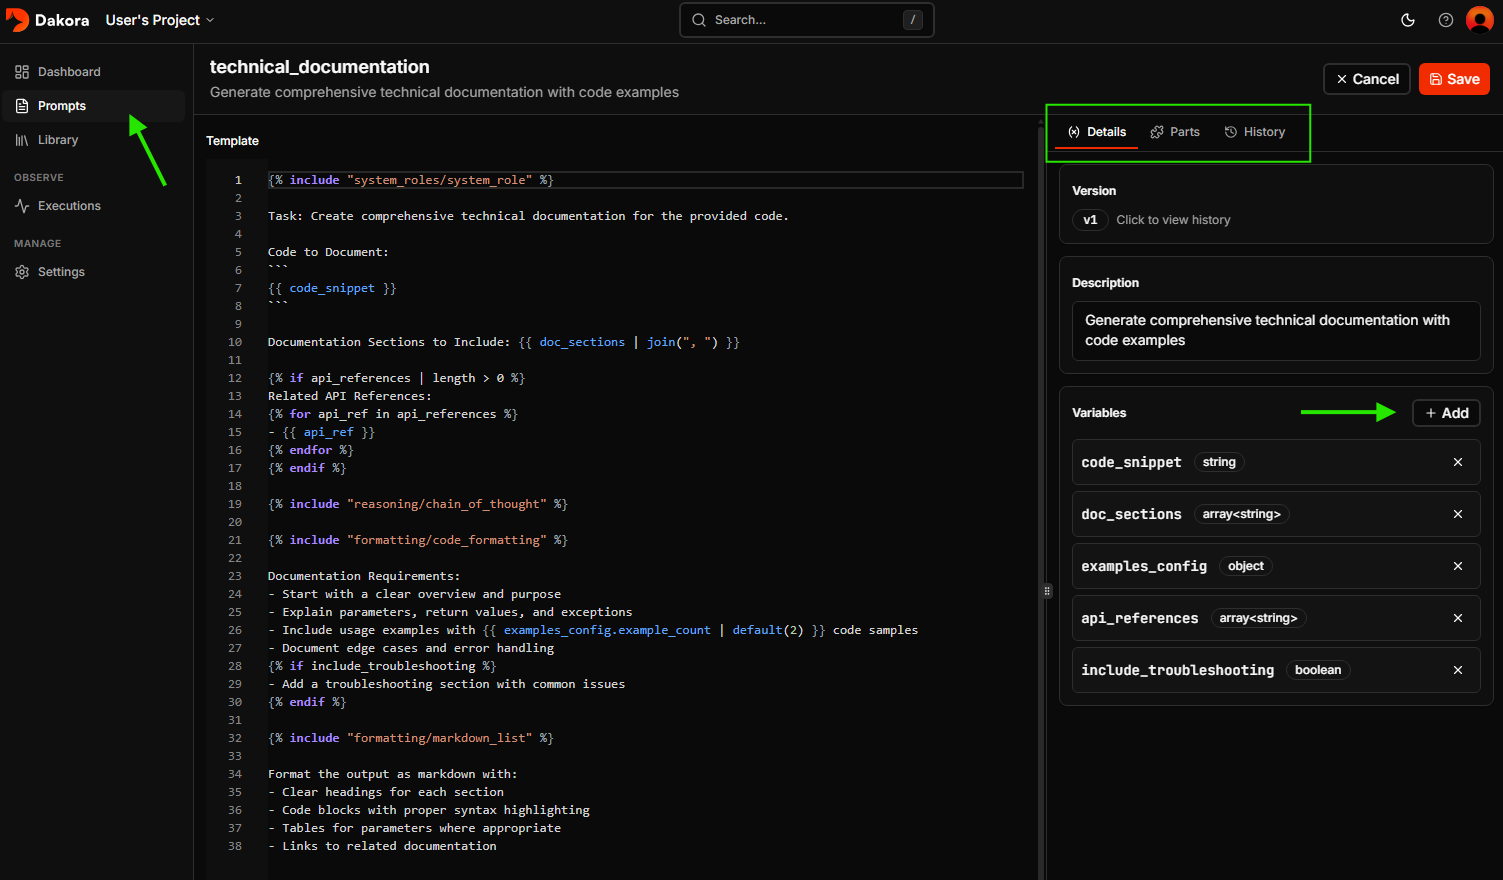
Write Your Template
Write your prompt using
{{ variable }} placeholders for dynamic content.3
Define Variables
In the Variables panel, add each variable with its type and default value.
4
Test in Playground
Use the built-in playground to test with sample inputs before saving.
5
Save
Click Save to make the template available via SDK.
Inputs
Inputs are typed variables that make your templates dynamic. Define them when creating a template:string, number, boolean, array<string>, and object.
Dakora validates inputs at render time. Missing required inputs or type mismatches fail fast with clear error messages.
Jinja2 Syntax
Dakora uses Jinja2, a popular Python templating engine, to make your prompts dynamic. Use{{ variable }} for inserting values, {% if %} for conditionals, and {% for %} for loops.
- Variables
- Conditionals
- Loops
- Filters
Parts (Reusable Snippets)
Parts are reusable prompt snippets that can be included in any template. Every project comes with built-in parts you can use immediately.Built-in Parts
Including Parts
Use Jinja2’s{% include %} directive with the path category/part_id:
Creating Your Own Parts
In the Studio, go to Library → Parts:- Click New Part
- Set a Part ID (e.g.,
company_context) - Choose a Category (e.g.,
context) - Write the reusable prompt content
- Save and use with
{% include "context/company_context" %}
Versioning
Every save creates a new version automatically. Templates start at version 1, and each save increments the number. Content hashing prevents duplicate versions.Pinning Versions
By default,render() uses the latest version. In production, pin to a tested version:
Rolling Back
In the Studio, open any template → click History → select a version → Restore. Rolling back creates a new version with the old content, preserving the audit trail.Rendering Templates
Rendering takes a template and fills in its variables with your inputs, resolves any included parts, and returns a complete prompt string ready to send to any LLM.- Studio
- SDK
- Advanced
In the Studio, you can test rendering in two ways:
-
Preview Panel: Shows your template with parts resolved, but variables remain as
{{ placeholders }}so you can see the structure. - Test Panel: Fill in input values, select an LLM model, and run the template end-to-end. This renders the template AND sends it to the LLM, showing you the actual response.
RenderResult
By default, Dakora embeds tracking metadata:
<!--dakora:prompt_id=faq_responder,version=1.0.0-->. This enables automatic linking of LLM executions back to templates. Disable with embed_metadata=False.Common Patterns
These patterns appear frequently in production templates:- Conditional Sections
- Dynamic Lists
- Fallback Defaults
Show or hide entire sections based on a flag:
Best Practices
Use Descriptive IDs
Use Descriptive IDs
Choose clear, descriptive template IDs:
- ✅
faq_responder,research_synthesizer,social_media_campaign - ❌
template1,v2_final_new
Extract Reusable Parts
Extract Reusable Parts
If you’re copying the same text across templates, extract it as a part:
Always Define Input Types
Always Define Input Types
Type definitions catch errors early:
Pin Versions in Production
Pin Versions in Production
Test Before Deploying
Test Before Deploying
Use the Playground to test templates before making them live.
Reference
Template Fields:
Input Types:
string, number, boolean, array<string>, object
Next Steps
Now that you understand templates:Try the Studio
Test your templates with real inputs before deploying
5-Minute Quickstart
Build your first template end-to-end
Track Executions
Monitor which templates are used and how they perform
Project Budgets
Configure spending limits